Tuesday, 26 July 2016

Bunting Time! (Template and instructions)

Download and print this small template
if you don`t feel like making your own!

(I recommend putting it into a word document just
to adjust the kind of size you want, it seems
a bit more accurate doing it that way).
In this blog update, I`ve made templates for your own bunting and further down there`s a tutorial and some step by step images to make my instructions seem a bit more clearer.

I`m not sure if everyone can remember me mentioning that I was going to be helping out my boss with doing up the care home a bit, well I won`t really be helping hands on, I`ve offered to do some bits for her and luckily she`s taken me up on that offer.
If you didn`t read about it then, it`ll be over on the live diary blog!


I`ve only just gotten into sewing really, and I`m already doing odd bits on my sewing machine for my boss.
One of the walls in the home is being turned into a seaside themed area, with 3D wooden beach huts coming off of the walls, painted blue sky in the background and seaside/nautical themed bunting on the walls! That`s where little Amy comes in to save the day!

It`s given me the proper chance to try out some of my new found skills and to try something new out on the sewing machine; plus, I want to make myself some and I want to know if I can actually do something like this without wasting all of my fabric. The Ilkeston Haberdashery just around the corner form the library had everything I could of possibly needed to get started on something like this, I know it seems basic to a lot of people, but I used to bloody hate textile work and now I love it!


I bought all of my fabrics for just under £16 pounds, and considering all of the other fabrics I bought that weren`t actually related to the seaside theme and where just for my personal use, I`d say that`s quite a good deal! I bought everything in half metres though since I`m trying to keep my spending at a minimum until my next payday; I`m also trying to save a bit of money before I start University in September as I need brand new equipment now.

Step 1.
Cut out all of your fabrics
and select two to pin
together!
If anything, I also want some bunting for when I move into my new room. My mum was also going
to throw away some old curtains, So I might of pulled them out of the bin and then used them myself to use for some extra practise with my sewing; the fabric is actually quite nice, it`s a dark creamy/grey kind of colour with dark pick flowers that have small grey stems coming out of them... Quite cute, but quite old aswell. I`m sure when I`ve finished practising I`ll be able to use the leftover fabrics for something that`s actually useful.
Step 2.
Once pinned together,
Begin to sew around
the edges. Be sure to
leave a gap at the top!
So the template that I used for the bunting that I made is slightly different and was harder to work with, in future I`m definitely going to use the bunting template that I made myself with the rectangle attachment for the fabric that connects it all next time. The templates that I used where slanted towards the top, but I found that slightly more awkward to work with. If you want to use the same template that I`ve used for my bunting, then use the second template that I`ve quickly put together; the diagonal edge on the top of the bunting made it some what bulky when I was adding the white fabric across the top, I do recommend the rectangle one, it fits into the fabric a lot easier when it comes to sewing it all together.

Tutorial starts here!

Step 3.
once sewn, simply fold inside out
so you can now see the nicer
side of the fabric, and none
of the stitches.
If you`re going to make your bunting the same as mine, then you`ll need double the amount of fabric cutting out; this entitles you too bunting that is double sided and has no visible stitches.

Once you`ve finished the incredibly tedious task of cutting out all of your fabrics, you`re going to want to begin pinning the pieces together. This is also why you need to cut out double the amount; you`ll need to pin your fabric in a certain way so that you get the right pattern on the visible part of the bunting.
To be honest, it is actually very straight forward. You`ll need to examine your fabrics and decide on which side would be best to be on show; in my case, this is darker side. Then get two of your cut out pieces of fabric, and sandwich them together so the side of the fabric that you would like to be visible is actually hidden. The side of the fabric that you don`t want on show, should be the only fabric that you can see; then, if you`re like me and struggle with keeping the stitches running in a straight line down the edge of the fabric, pin it together for extra support.

Once it`s pinned and you`re happy with the arrangement of your fabrics, begin to sew around the edges of the two pieces of fabric that have been sandwiched together.
Since we also have that extra section at the top of the template, you can either; not sew the extra section at all, or, sew half of it and then leave a gap. The gap is just so you can pull the fabric inside out, so you can then see the nicer side of the fabric that will then be on display once your bunting is complete.

After that, you should have selection of adorable triangles that you can then arrange into a pattern. In my case, I only had two different patterned fabrics too arrange, (light green with pink flowers, cream with pink flowers) so mine was pretty straight forward to arrange.

Step 4.
You`ll need extra long plain fabric
to hold all of your bunting together.
Sew one length and one width.
If you also haven`t had a cup of tea, go grab one and then continue, even little artists deserve some sort of tea break.

Step 5.
Pin it all together and
start sewing!
The last part was really fiddly, especially if you have rather chubby fingers like mine. You`ll need a few long stripes of plain fabric, and this will work with a 3cm or 4cm width. For my bunting, I`m using a light, thin, creamy coloured fabric and sewing it all together with grey thread.

I chose to use 3cm wide strips for my bunting, and my fabric wasn`t long enough to be a straight strip of fabric; so I had to cut out an extra strip to add more length. But, we`re going to be doubling up our fabrics, so because I have had to use two lengths of fabric, I`ll need to cut out another two so I can double it up. Once you`ve cut them out, sandwich the fabrics together and pin them in place so you can accurately sew them. When sewing these strips together, you`ll own want to sew one length and one side. Then fold the strip inside out and pin it down; since the strips aren`t that wide, they`ll just pop back up once it`s been folded inside out.
Only sewing one length and one width, means that we`ll be able to slot the bunting inside and stitch altogether.

Before you begin to slot in the previously sewn flags, you`ll want to measure the distance in-between the flags, just too make sure everything is even. The way I measured mine was too fold a flag in half and use that as a make shift ruler; placing the top of the flag along the plain strip of fabric and then placing a flag each side, this meant I had smaller gaps and my bunting looked fuller.
You should hopefully end up with
something a little bit like this!
When you`ve got the bunting pinned inside of the strips of fabric, go down the strip and fold in a tiny bit of the fabric and then pin it; you`ll then have to sew down this folded line to ensure that you cannot see the edges of the plain fabric that you`re using to hold all of the bunting in place. Try and use threads that are a similar colour to the plain fabric, you`ll be able to see these stitches and you`ll want to use something that looks neat.
This part is very fiddly, so take your time to fold in the fabric and pin it in place; without the pins the fabric may become untucked and you`ll be sewing the edges of the fabric, and the edges are what we need to hide. Since we had only sewn down one width, you can also go and sew down the one that we`ve left out when you`re completing your bunting.

Hopefully you end up with something like mine, hopefully anyways.
A lovely close up of the bunting that I`ve created throughout
this tutorial.
very vintage looking patterns and colours!
I never do tutorials, or instructions on how to do things like this, and this is actually my first proper textile walk through I guess. I`m going to be working on some more bunting aswell, so you`ll probably see those somewhere later on. I`m also going to try and make something a bit more creative out of the scraps of fabric that I`ve got laying around.
I do apologise if the tutorial wasn`t that straight forward or clear, I`ve tried to phrase everything so I`d understand it and I`d think it`s clear. But then again, we all read things in different ways and prefer different tutorials. Hopefully the images I`ve added make it somewhat more clearer for you.
Feel free to use the templates that I`ve created, I got ideas for my original template online since I`m terrible at measuring things so it`s all pretty and even.

I hope this made some sense! You`ll see all of my other creative pieces appearing soon, and in the next update I`ll be showing you how to do some basic flower pressing!

If I`m playing Pokemon
go, I`ll be playing it like a
true fan!
Live Diary Blog:   http://melonheadamy-livediaryblogging.blogspot.co.uk/
Art Blog:   http://melonheadamy-artblogging.blogspot.co.uk/
Anime Reviews:   http://melonheadamy-animereviews.blogspot.co.uk/
Facebook:   https://www.facebook.com/melonheadamy
Wattpad:   https://www.wattpad.com/user/AmyWatkinson
Live Hereos:   https://liveheroes.com/en/brand/melonhead-amy
Redbbble:   http://www.redbubble.com/people/amywatkinson
Deviantart:    https://amywatkinson.deviantart.com/
Instagram:   amy_marshy_melons


Wednesday, 29 June 2016

Knitting work! Think I should retire early!

These knitting needles are bloody
huge!
Ughh, no sixth form for the past two weeks has been incredibly boring for me; I feel like I`ve got absolutely nothing to do all of the time... So, I`ve had to improvise quite a bit and make something for me to do! If that even makes any sense...

I`ve invested some money in some pieces of fabric and stuffing, some new knitting needles and some new small balls of wool that I got locally! There`s a small haberdashery that`s been in Ilkeston for years, and it`s just around the corner from the library in town;  I remember my grandma going in there quite a bit, but I`ve never actually been in there by myself or bought something.
It`s only small, but it`s got a giant range of practical textile equipment and sewing machines, at AMAZING prices; Definitely the cheapest place I`ve been too, and from using the wool and the new knitting needles, I`d say that their really good quality.

I can`t believe how cute this
fabric is!
I haven`t cut it all up yet..
I`m definitely going back there for more materials, I got half a metre of the cutest fabric for only £2.65! and the chunky knitting needles I got where only £6, and they`re 15mm; they`re bloody huge, but they`re very easy to use. At the moment I`ve got tons of balls of wool, I`m not sure as to why I keep on buying even more, I`m beginning to run out of room for everything, I don`t know how I`m going to cope when I got to University and I`m bringing all of my equipment and materials home!

Despite running out of room in my own bedroom, I do want to invest in a pattern book for my sewing machine, embroidery and knitting. I am thinking that I might aswell retire right now, but I`m finding it as a quite fun hobby whilst I`m not at sixth form; I may pop in though soon to scan some work in and then photoshop for redbubble, but for now it`ll just be knitting and sewing machine work.
Hopefully, If I do find a decent pattern book for my sewing machine then I`ll be able to make a lot of my own clothing, and it`ll hopefully be quite useful for when I go to University; it`ll definitely show that I`ve got more skills than throwing paint at a canvas.

Just as a beginning to my knitting and sewing work, I started off by making a some small samples that are now in my knitting and sewing scrapbook... which is under my bed and under all of my other sketchbooks and giant portfolio, so I actually can`t get it out.
Through the samples and practicing my knitting with small needles, I`ve used my bigger needles to try and make something practical that I can actually use. So I went for the easiest thing that I could think of, a bloody scarf.

Yes, how very original and complicated; but then again I`ve only just started doing knitting and things that I should start doing when I`m retired...

I used two separate balls of wool to make the scarf, and it isn`t too long since all of my other scarfs always poke out the bottom of coats. It was a bit weird using two different balls to knit with at the same time, and because it was my first time using two balls of wool; I kept on getting confused and ended up adding stitches by accident... I`ve got no idea as to how I kept on doing that, but it meant that my scarf started off quite slim and then got bigger towards the end, kind of like a chubby worm? Yeah, let`s go with a chubby worm.

Since the weather has also dropped slightly cold around here, I sat with it around my neck for a while to keep me warm. I have to say, I`m quite impressed with myself; even though to make a scarf like mine, you just keep on using the same simple knit stitch until you think it`s long enough... I just kept on measuring mine by wrapping it around my neck and then seeing how far it comes down my torso. It really is comfy, I thought that I wouldn`t be able tog et it that long and that I would run out of wool before it got that long, I only had about 4 inches left of white wool by the time I had finished my scarf.

Next I`m going to knit my nephew a blue and white scarf, and then my older sister is going to have a red and white scarf; So I`m going to have to go out and try and find some similar coloured wool to what I have now, since I don`t think I`ll have enough to finish enough complete scarf. 

it really was easy to make, I would say that this should be a starting point for anyone who`s just starting out at knitting and textile work.
The best thing is, my mum and little sister know how to crochet; so last night we all sat down and watched Wimbledon whilst knitting and crocheting. It was weird, very weird, there was wool everywhere and the dogs where lying all over what we where doing because it was warm and soft for them.... Think I need to move into the care home that I`m working at!


Live Diary Blog:   http://melonheadamy-livediaryblogging.blogspot.co.uk/
Art Blog:   http://melonheadamy-artblogging.blogspot.co.uk/
Anime Reviews:   http://melonheadamy-animereviews.blogspot.co.uk/
Facebook:   https://www.facebook.com/melonheadamy
Wattpad:   https://www.wattpad.com/user/AmyWatkinson
Live Hereos:   https://liveheroes.com/en/brand/melonhead-amy
Redbbble:   http://www.redbubble.com/people/amywatkinson
Deviantart:    https://amywatkinson.deviantart.com/
Instagram:   amy_marshy_melons


Wednesday, 15 June 2016

Personalization Time!

I`ve even been customising some of my smaller
sketchbooks!
That`s it guys, I`ve officially finished sixth form now! I`ve been going on, and on, and on about sixth form for months on end now... But that`s it!
Since all of my storage boxes that I kept on my desk at
sixth form had gotten really dirty, I decided to jazz them up
Just a little bit.

I`ve been signed off of my course officially and I`ve handed in all units for my coursework, I`m still going in every now and again to scan in some work and help out the teachers by being their art technician; But work wise, I`ve done!
I`m extrememly happy and excited at the fact that I`ve finally finished sixth form... but what comes next?
Well for starts, I`ve had to bring every single piece of equipment home which means that my room is now full of folders, boxes and random glue sticks with no lids!

I`ve struggled a little bit with taking everything home and finding a way to store it all inside my tiny box room. luckily, I`ll be moving into my little sisters room, we`ll be swapping so I`ve got room for all of my University equipment and books. At the moment, there are boxes shoved underneath my bed and a bag of spare fabrics for my two new sewing machines, so it does feel quite weird having to have everything crammed inside my room... It`s even weirder not going into sixth form everyday.

I`ve even been through all of my sketchbooks and I`ve worked on customizing those quite a bit, like adding brown paper covers and adjusting the metal binders on them. So at the moment, it`s just getting things ready and trying to keep myself occupied with little things; soon, I will be working full time up until September which is when I`m starting university... So for now, I need to find something to do to keep me somewhat occupied!
Something that I have been trying out is small DIY bits, for instance; My friends found a small tutorial on how to make decorative hedgehogs  out of old books, no glue needed too! Unless your adding buttons and bows, then you may need a small amount, but apart from that, you just have to keep on folding the pages over and over again for it t be stable.
I won`t be writing the tutorial, I`ve got some small pictures above, but the tutorials can be found anywhere and I don`t quite see the point in copying off of them.

I`ve also got my hands on two sewing machines! I`ve got two as I bought a second hand old one, and then a friend from work had a spare one that was just sitting in her garage, so she`s kindly given it to me for free! Lately I`ve been messing around by doing a few bits on there, mainly just heart bunting for my new room; I haven`t used a sewing machine in about 2 years though, which is making it very awkward to get back into the habit of using. I have also begun to personalize one of the sewing machines, It` been spray painted plain black at the moment, I just need some gold spray paint to add the splatters over the top of the black. So, it`s not quite there yet, but spray painting it black beats the dirty look it had before.

Over summer, I`m going to be investing some money in a scanner so I can keep on uploading my work to deviantart and on this art blog. Hopefully, I can find somewhere local that sells fabrics and small bags of stuffing so I can keep on producing small bits of work on my new sewing machines. Hopefully, I`m also going to buy a pattern book for my sewing machines, so I can make things that will actually be wearable, should be fun to experiment with over the summer holidays!

I`m also hoping, really, really hoping that I can go back to shed2studios at some point to go back and do some work with Dawn Turner! If you can`t remember Dawn, she is a local glass artist that let me work with her for a few days within her studio space... she`s amazing! Even though I`ll be working full time next month, I`m hoping to see her for a couple of days just as a catch up before University and of course, for advice! I`m hoping to do quite a bit of work within glass myself, and I`m hoping that she can give me some advice on where to start.
Looking forward to this summer!


Live Diary Blog:   http://melonheadamy-livediaryblogging.blogspot.co.uk/
Art Blog:   http://melonheadamy-artblogging.blogspot.co.uk/
Anime Reviews:   http://melonheadamy-animereviews.blogspot.co.uk/
Facebook:   https://www.facebook.com/melonheadamy
Wattpad:   https://www.wattpad.com/user/AmyWatkinson
Live Hereos:   https://liveheroes.com/en/brand/melonhead-amy
Redbbble:   http://www.redbubble.com/people/amywatkinson
Deviantart:    https://amywatkinson.deviantart.com/
Instagram:   amy_marshy_melons


Wednesday, 1 June 2016

Final Piece!

Click on the images below to make them bigger, that way they`ll look a
bit better.... Hopefully.
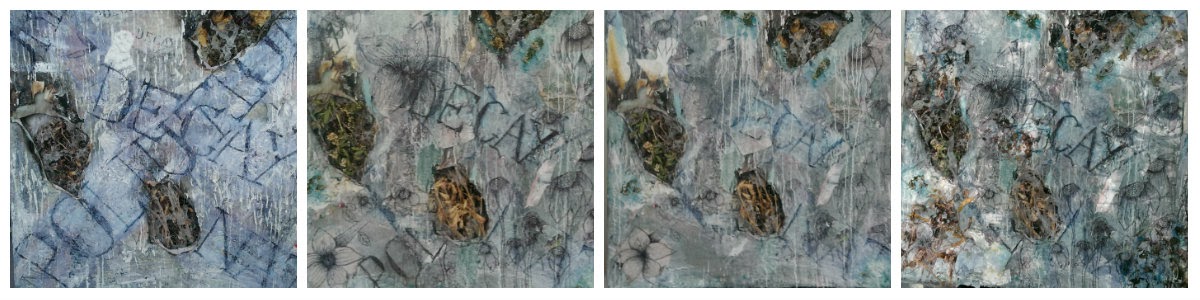
You may of heard me not shuting up about this bloody final piece that I`ve been going on about for months on end now. But I`ve finally got it done, and if anything... I bloody hate it, I literally hate it; all because of the final outcome.
The three days seemed to of gone quite slowly aswell, probably because I had to keep on waiting for everything to dry for a few hours each day... Which then gave me even more time at the end of the three days to just add a few extra final touches.
The whole piece included a lot of fire, a lot of plastic fusion and a lot of burning myself on a hot glue gun that has no temperature control on it whatsoever... I`ve still got some areas healing on my hand from where the hot glue had burnt me quite quickly.
it took a while to complete, and I`m really disappointed in myself since it doesn`t look like anything I had imagined it to look like.

For starts, I had three different boards that I was going to complete for my final piece... Which would be quite a challenge within itself to complete three boards as a collective piece.

To prepare myself for the exam, Since you can`t put everything together until the exam, I began to wrap different layers of papers with different thicknesses around the board and let it all dry... here`s the way you get around the rules though, even though it was wrapped around the board, it wasn`t actually glued down to the board, there was just glue on the paper to hold the shape together. I actually did this same little technique during my last exam in year 12, it allows you to start the layering in the background as int he exam, you won`t have near enough time to wait for everything to dry and for everything to set correctly.
I had to do the paper wrap layers on all three boards, and they had to be quite thick since I had to set them on fire... Yes... I was setting everything on fire, and everyone was getting quite mad with me because of the smell that kept on coming into the art rooms; luckily, I didn`t set any of the fire alarms off... I think I might of been close to doing it twice though.
I also had to have David on stand by with some water, since when I did it by myself, It got wayyyyy put of control and burnt through the back of the canvas and then began burning the paper that was at the back; after that it didn`t stop and I had to scream for David to help me so I could finally put it out, I think I also singed my hair a little bit.


The base layers where the layers that I had to focus on before the three days we had for the exam. The paper layers weren`t stuck down still, but I threw a lot of ink and paint at them that just seemed to be completely random colours at first.
But they eventually blended into the correct colour scheme towards the end of the piece. One of them had a bright, bright green base, another had a very dark grey and another had burgundy... The amazing thing is that, now you can`t tell which one was which unless you look quite closely, you can kind of see the colours a few layers back slowly blending into the greys and white washes that are on the top layers.
The inks really helped pull the colours together too, they where much paler, so when I began to start the white washes on top; they added pale tons from the first few layers and it added a nice effect with the blending.

I think the one thing I really struggled with in these pieces, was the illustrations and text that appeared on top of the initial layers that I created. The pens that I used, yes normal bloody pens, They wouldn`t bloody fade out when I used the white washes over the top. Which then meant that there where a lot of random white patches where I tried to cover up the thicker parts of the text. It was just normal biro pen that I used, but for some reason it just wouldn`t fade out when I covered it.
I also had to use a lot of ripped up pieces of dyed papers, chip paper, packaging paper and paper just with normal scribbles on. Working over the top of these, and then peeling them back off meant that I had layers of colours and texture that I had worked over earlier. A lot of the textures where quite thick and I was getting quite annoyed with myself as the first textured layer I added was wax, which meant that I wouldn`t of been able to draw back over the board normally, then I added plaster and thick emulsion paints.
Worst thing was, I did this to all three boards before realizing that I had completely forgotten to do the illustrations and text first, which meant that I had to use a wallpaper scrapper to get it all back of. That then wasted a lot of time during my exam.


The last few layers that I added where some of the hardest ones, since these would just finish off the piece; they where supposed to be more detailed and more textured, but they came out a lot more differently than anticipated.

Before I worked over the board properly, I cut some holes into the back of one of the boards, and then holes in the other twos paper wraps. This meant that I could then add plastic fusion work through the holes so it looked like they had been burnt away to then be revealed... If that makes any sort of sense. When the plastic fusion came through the back of the board, I had to melt even more plastic over the top to make sure that it blended in properly with the backdrop I had created. This was one of the very last things that I did to my pieces, I wouldn`t of been able to do anything over the top of the plastic since it`s just too stiff to even move. This meant that on the last day, I had a huge, huge rush to melt everything over the top of the board.
On the second day of the exam, I actually had to stay behind to get some preparation work done to then melt on the third day. I had to make loads of layers of flat plastic fusion in the heat press, then I sewed them all together and created patterns and flowers with the stitches.
Then when it came to melting all of the plastic work, I had to go outside and then re-melt all of the plastic fusion with stictches, and the plain pieces of plastic I had to then merge everything back together. It was ridiculously hectic.
Like, very ridiculous and I`ve never stressed out so much over the course of three days before.

Hoping my final piece will look better once it`s
in the exhibition!
The worst part is...
I`M NOT EVEN HAPPY WITH THE WAY IT LOOKS!
I spent three whole days, I spent loads of extra hours staying behind at sixth form to get more work done, only to then be disappointed in all of that hard work that I did.
I know for starts that it`ll look wayyy better once It`s in the exhibition in the gallery, at the moment I`ve just got my board balancing on three plastic boxes and my two smaller boards on two dirty old easels.

I am really, really annoyed at that fact that we didn`t get to go down to the gallery to see what our work would look like, I would of carried it all down there and I would of set up everything myself, but the teachers said no when I asked. It`s just sooo annoying because the projector was dirty, and wonky because it was on my desk, the easels where dirty, my biggest board was just balancing on a bunch of boxes and it kept on falling off whenever I had to lean on it to add more illustrations.

It`s so frustrating.
I`m happy that I`ve finally got it done, and I`m kind of happy with the way it looks at the moment; but I do know for a fact that it`ll be better when it`s up on display in the gallery.
I need to clean the projector aswell, and hopefully find a table that isn`t wonky, find some easels that aren`t as dirty as the ones up in our art class and then get some metal hooks in the back of the biggest board so it isn`t left balancing.

It`s just waiting for the exhibition now...


Live Diary Blog:   http://melonheadamy-livediaryblogging.blogspot.co.uk/

Art Blog:   http://melonheadamy-artblogging.blogspot.co.uk/
Anime Reviews:   http://melonheadamy-animereviews.blogspot.co.uk/
Facebook:   https://www.facebook.com/melonheadamy
Wattpad:   https://www.wattpad.com/user/AmyWatkinson
Live Hereos:   https://liveheroes.com/en/brand/melonhead-amy
Redbbble:   http://www.redbubble.com/people/amywatkinson
Deviantart:    https://amywatkinson.deviantart.com/
Instagram:   amy_marshy_melons

Friday, 13 May 2016

Knitting and Sewing Work!

You see this blog regularly? Well then, this might be very new for some of you, as you will always see fine art pieces on this blog and absolutely nothing that`s textile related in anyway. Well, there`s a slight change there...
I first started off by making some small nautical themed
pillows for my nephews new room, since they`ve
just moved out.

A bit of back story on this:
When I was younger, I absolutely loved fashion and sewing and embroidery, seriously loved it. When I finished primary school and entered senior/secondary school I left that kind of art and went onto the normal curriculum which was making paper mache watermelons... or ice cream cones, which ever they preferred to do on that day. Secondary school`s art was absolutely terrible and not enjoyab
I found an old manky dress
I ordered a year ago, un-picked
the whole thing and then
turned the bottom half into
a cute skirt!
le whatsoever, I only enjoyed it when I took it for GCSE and I got to do something that was at least a bit interesting.
But in the end, I never did go back to fashion or embroidery and I forgot about it really. But since I`m going to University for Fine Art I`ve been thinking about going back into something to do with sewing and fabrics, not exactly fashion, but something to do with sewing machines and all of that jazz. I`m also going to invest in a sewing machine for at home, since I`ve been using the ones at sixth form which constantly break.

I started off by making some yellow and white polka heart bunting for my older sisters new bedroom, and then I moved on to the cute nautical themed pillows for my little nephew. The fabrics where quite cheap and from eBay, my older sister ordered a pack of them and never got round to making anything for Owen so I took over and made some pillows for him.


I also taught myself how to knit, well partially anyways. David`s mum, Kelly, showed me how to cast on and do a basic knit, then I had to teach myself how to cast off the knitting. It`s seriously therapeutic to do and I quite like just sitting in bed before I go to sleep just knitting away like a little old lady... Like seriously, I`m 18 and I sit in bed knitting at 10 o`clock at night. Grandma, I`ve aged over night!
My little sister also gave me one of her knitting and sewing books, she doesn`t even know how to knit or sew, but it was an old Christmas present from someone in the family. I haven`t actually used it yet, but it does have some cute little knitted flowers in it and some new techniques that I can try. At the moment I can only knit the basic knit... If that makes any sense.
I am slightly impatient when it
comes to the knitting!

I do want to make some more bunting, possibly for my room or something, that`s when I move into the bigger room and I get ready for University. Sometimes I regret not staying down the fashion/sewing route, I quite enjoyed making the small pillows and the bunting; I will want to try and make something for myself but I have no idea as to what I could possibly make that would fit nicely in my room.
If anything, I just can`t believe I found that old shoebox with all of my old threads and needles in!

The only down side to all of this, is that I haven`t been able to go out and buy my own sewing machine that I can use at home; at the moment I`m using some of the ones at sixth form and they keep on breaking since they`re so old. I`m not sure where to get a decent one, or should I get a second hand one... I kind of want to personalize it when I do get it, I hate the boring old white ones and I want one with a bit more "Amy" in/on it. I think I need to invest in some black and white spray paint and give it a go once I find a second hand sewing machine.


The other down side there is, is that I haven`t really found a way to incorporate this into my current project... which by the way, is almost completely over! I`ve got the three day exam this Tuesday coming and I think I`ve gotten everything that I`ll need ready; I`ve still got Monday to finish off the last little bits for my three pieces. I have found a small way to incorporate the stitch work into my project; I`ve made multiple layers of plastic fusion and have then sewn them together and created some cut work samples... But because of all of the layers and different material sandwiched in between the plastic, you can`t see the stitches very well; Next time I`ll have to use a thicker stitch setting. But then, to merge it into my work I`ve got to burn it all with the heatgun, and because it`s been placed in the heat press already they burn up so quickly and then leave the stitches, leaves and petals behind.

The preparation work at the moment looks alright, I`ve done 5 or 6 boards that have lead up to the three final piece boards. But no more sewing work for this project, it doesn`t really relate to my project that much... So I`m going to have to leave the knitting and sewing for other bits of work and some crafty kind of bits that I`ll end up doing in my spare time.


Live Diary Blog:   http://melonheadamy-livediaryblogging.blogspot.co.uk/
Looking like sid the sloth
Art Blog:   http://melonheadamy-artblogging.blogspot.co.uk/
Anime Reviews:   http://melonheadamy-animereviews.blogspot.co.uk/
Facebook:   https://www.facebook.com/melonheadamy
Wattpad:   https://www.wattpad.com/user/AmyWatkinson
Live Hereos:   https://liveheroes.com/en/brand/melonhead-amy
Redbbble:   http://www.redbubble.com/people/amywatkinson
Deviantart:    https://amywatkinson.deviantart.com/
Instagram:   amy_marshy_melons


Friday, 29 April 2016

Projection Work!


This is the last project, and after this week I`ll have only one week left until the three day long exam that I have to do. I`m looking forward to it now, I`ve kind of got a good idea as to what I`m doing right now and what I should be doing during the exam days and I`ve got a brilliant idea as to how I should be displaying my work during the next exhibition aswell... No idea as to if it`s going to work, I hope it is, if it doesn`t then I`m probably going to get rather frustrated. It`s got something to do with using an easel and then using a heat gun to burn everything I`m going to be putting around it... I think I`ll need two of them, and I`ve also thought of a way to somehow connect them, not sure if that will work either, but I`ll have to see later on.

The teachers have been suggesting projection work for ages, but I`ve never really taken to it after an artist came into out sixth form... and to be honest, I wasn`t to impressed with it, so I never ended up trying out anything to do with projecting my work or projecting my photography. But seeing as this is the final project, and I`m pretty much not going to have access to some of the equipment I have right now, I decided to give the projector a try for once.

Now if your English, then you`ll remember those big box projectors that the music teacher had to repeatedly change the film on so they can show the lyrics again... if that makes sense. Anyways, if your British then you`ll know what I`m on about, because I guarantee you that you had to sing terribly religious songs when you aren`t even religious. Yeah, primary school is rather weird over here.
Now, if you don`t know what I`m on about, the projector is a large metal box with a light inside, from the box there`s a metal pole that has a two way glass thing that then projects any image that you have on film that is then above the light.
Anything done with just normal paper will block out the light and nothing shines through, which means It`s also expensive because of the film we use at sixth form. It`s simple really, you just have to photocopy the image onto the film and it comes out perfect.

Because the film is quite expensive, and I don`t want to be using up the film that everyone else might need... So, I`ve tried placing solid objects over the top of the projector instead. They come out a lot crisper and cleaner than the photographic projections, most probably because they just came out as a greyish/black colour unlike the photographs.
The main idea for the projection work at the moment is to just use them to go over my final piece once it`s on display in the gallery at the end of the project. The problem that I have at the moment would be focusing everything correctly, on all of these images I`ve placed the projector about 6ft away from the wall, and then the focus is about 3/4 up... There`s just a little turny knob to focus, there`s no settings you can just change, you have to turn it until it looks alright. It`s also quite handy for drawing, you can project an image and then draw round it on a canvas or sheet of paper that`s up against the wall.

I`ve also used one of my friends, who looks slightly drunk on the image (but she isn`t don`t worry, the projector was too bright). It`s interesting, it gives such an old retro look to whatever you decide to project, I prefer using old fashioned things like this, rather than a brand new projector and MacBook... Just grab an old one and some film and see what you can do!
Quite enjoying this at the moment, it`s something different that I haven`t tried out properly before, and I do love the vintage themed look it gives out, and I don`t usually do vintage styled work really. I`m looking forward to what it`ll look like when my final pieces are finished and put on display with a projection over the top, I just need to decide on what to actually project..


The lovely Georgia <3 !

Instagram: amy_marshy_melons

Monday, 25 April 2016

Redbubble Products!

And now, a post completely dedicated to Redbubble products that I have been producing lately...

As you may of noticed in the links at the bottom of my posts, I`ve been adding in my Redbubble link every time. Just to make sure you check them out some time...
Unfortunately, I haven`t actually sold anything on there yet and I am going to lower the prices so they`re more affordable; you don`t want to be paying £10 just for a notebook really. So tonight, I`m going to be lowering the prices by just a tiniee tiny little bit so hopefully, some of you will buy something.. some day.. Thanks.
I`ll be working on some more illustration designs soon, keep an eye out for them on Deviantart first!


I haven`t really shown everyone all of the designs so far, and I still won`t be able to include them all on here. If you keep up with my Redbubble account, then you would of probably seen quite a few of the newest uploads, and I`ll be updating with some more photography products soon.
I have been working on a lot of illustration pieces recently, none of them however are for my current nature themed project and they`re all in a separate sketchbook that I keep with a bunch of other ones underneath my bed. All of those sketchbooks are for private drawings and designing, and I never use them for sixth form work or studying, they all also have labels and are only used for one type of drawing per sketchbook.
I haven`t had that much time to be working on private work really, it`s quite sad since I thought I would be able to relax and draw whenever I want too. But I`ve started my new job and since my exam is coming up (which I won`t shut up about) I really don`t have the time to sit down and design small illustrations or mandalas.

The thing with Redbubble, is that any of my work from this current project can be easily added onto any products I want. So right now, it doesn`t matter if I can`t do cute little illustrations, sugar skulls or mandala patterns... I can use anything from my current project and then just transfer it over easily. One slight problem that I have been having, is how blurry it`s been making some of my images and some of my photography work. I`m still trying to get it all sorted out, and I don`t know if it`s my terrible photoshopping skills that are coming into play, hopefully it is cause I know how bad I am at photoshop and hopefully one of my friends can help me out.

Here are the other three latest designs, that I`ve literally only just uploaded; hopefully I`ll be able to sell some when I lower the price and I`ll be trying to get my artwork out there again on Deviantart aswell!


Live Diary Blog: http://melonheadamy-livediaryblogging.blogspot.co.uk/
Art Blog: http://melonheadamy-artblogging.blogspot.co.uk/
Anime Reviews: http://melonheadamy-animereviews.blogspot.co.uk/
Facebook: https://www.facebook.com/melonheadamy
Wattpad: https://www.wattpad.com/user/AmyWatkinson
Live Hereos:
https://liveheroes.com/en/brand/melonhead-amy
Redbbble: http://www.redbubble.com/people/amywatkinson
Deviantart: https://amywatkinson.deviantart.com/
Instagram: amy_marshy_melons