Sine we`ve been back at sixth form, i think i have been rather lazy when it comes to producing work. So, to go towards Experimentations and Materials; i`ve been using all sorts of different things to create weird looking and rather sharp backgrounds for my work.
Here`s the end results and how to create weird and interesting backgrounds.
I haven`t currently got pictures of every single backdrop that i`ve made, but here are a few pictures of how to build up materials and a few explanations as to how to get the best outcome for them.
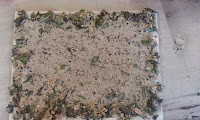
This canvas is only quite small but it`s layered up to hell with different things.

So i just threw everything into one bowl to do this.
First off i only used a small amount of plaster, then watered it down a ton. Then you just add anything you want, like literally anything! As long as you can create a consistency like a paste once everything is in there, then add whatever you want.
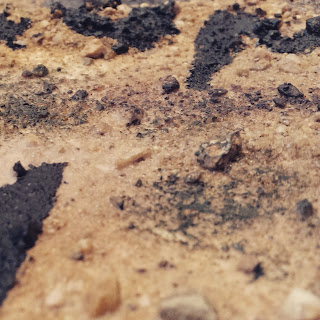
So for my textured backdrop paste i used; watered down plaster to keep it all together, then i added sand and a little bit of dirt, then crushed up small leaves, (don`t mix anything yet), then i added broken glass, little bits of crushed up tree bark and small parts of crushed dried seaweed.
Then to make it into more of a paste like substance, i added PVA glue on top of it all, (and if you have it, also add Binder on top), then i added some water and began to mix it all up.
But don`t just add loads and work from however that worked out, add small amounts of water at a time and make sure all of it has been mixed together each time.
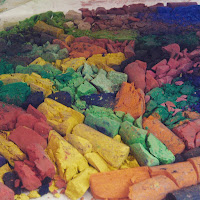
Also, using chalks and pastels can be equally as interesting; as long as a large amount is used to equal out the lack of other materials. So to crush mine, i put old chalks and pastels in an envelope and sealed it; then i used a hammer and just smashed it up, quite fun actually.

Another good texture to use is wax.
So in sixth form we have a bunch of wax pots to use, but i chose the one that leaks out of the sides and ends up turning wax yellow. It just leaks slowly out of the sides and for some reason turns this yellowy color, and wax does come out clear when normally used.
So since this leaked everywhere, i broke up parts and got the hammer again to crush them into smaller bits to be added to different mixtures that i was using. It mainly added a lot of smooth bumps to the textures, but it`s hard to see if there are a lot of different materials added.
if you don`t want to make the textures that thick, then come up with a bright background that will come through the textured paste you`re making for the main backdrop.
So to do this background; i soaked some thick A4 and A3 paper for a few hours. Then i laid it down whilst it was still soaking wet and dropped Batik ink over the top of it, and because it had been soaked in water for a few hours; the ink bleeds out and crates some really cool different patterns.
But to finish mine off, i also dropped Bleach over the top of it which bled out and created some cool looking shades. If you read any of my other art blog posts, then you should know by now that i love using bleach.

Here`s another quick bleach and ink backdrop that can shine through and make quite thin layers of texture look awesome. This one is a lot more basic aswell; Just some dark batik ink, then if you use a small paint brush and just add some small lines here and there it can look a lot more interesting.
If you also add th bleach whilst it`s still wet, it`ll bleed out quite a bit and become messier.
But when it comes to using materials, just use whatever you can find and see what it turns out like afterwards. I just chose materials that i had to hand at the time, but if you plan out what you`re doing and what should happen with the textures trying to create... Then stop.
Be spontaneous and try whatever, don`t plan it out as planning can produce boring and bland work; try something that you`ve never done before and take as much time as you need to do it!
 |
also try using sand and paints. i`ve kept the original sandy color and then
added paint and ink over the top of it.
Don`t add thick layers of paint! Light applications only! |
 Also; follow these links down below to find out some more about me, and to keep up with my regular updates!
facebook: https://www.facebook.com/melonheadamy
Wattpad: http://www.wattpad.com/user/AmyWatkinson
Live diary Blog: http://melonheadamy-livediaryblogging.blogspot.co.uk
Anime reviews: http://melonheadamy-animereviews.blogspot.co.uk
Instagram: amy_marshy_melons


